Monday, November 16, 2009

Test fit of post and rail


The first section of fencing for Merritt is to be assembled in the next few weeks. We have done some test fits so far. It is difficult sometimes because we have various people working and simple things like leaving too much material after a saw cut can lead to quite a bit of work paring away with your chisel.

I took a quick picture of how a post and top rail fit together. Turning the 4x4 on its edge gives natural slopes for the little roof that will be housed a top, but is a lot of work and required some angled holds while sawing and chiseling.

We should have about 16 feet installed in the next few weeks. It is really slow going, but doing it all by hand is very time consuming. It does really become a meditation while working, which is good for the soul I think.

Monday, October 12, 2009

An interesting challenge


As an exercise to work out some details in the large fence project the Daikudojo folks are beginning for Lake Merritt in Oakland Ca, we discuss some of the ways we can use different joinery in the building process then work out rough test pieces on joint models.

One interesting challenge came as a few of us questioned a joint that had two 2”x 2” crossing on edge. The fence we are building will have a top piece on edge ( a 4”x4”) which will act as a roof for the top of the fence. There will be pieces added that will be inset in the 4x4 that will act somewhat like truss arms ( for lack of a better work and being tired and on a 13 hour train ride) where we will then add a 1” thick maybe 8” wide cedar board on either side.

The "assignment came about as fellow students of Van Arsdale Jim and myself were looking at a joint Jay had come up with as a possible candidate for out fence project joint. The joint was made of two pieces crossed on edge (think diamond) and then a mock up post where the joint was to sit upon. After looking the joint over for a while Jim and I talked about the difficulty of this joint and also this is a 200 ft fence which means a LOT of these things. We both went off and started drawing while dumbly looking around. After a lot of “how do I even mark this thing up let alone cut it” thoughts, I just started trying to be logical and wondering why I did not take geometry again in college.

Adding to the idea is that the post would come to rest below the side wings of the 4x4 ( think of the top pointing up). The example in the photo shows the two pieces and what
the 6x6 would like like ( it is a joint model as well) after it is cut up.

Adding another challenge was the idea of making the center piece of the post a tenon that would go through the 4x4 ( Im not making this up....) and be wedged at the top (all covered up by the top so no rain issues on the end grain.

In the end it looks like we are looking at a different option to affix these pieces together in the fence. I guess the fact that we have until 2010 to finish and not 2015 might be a reason. The interesting thing about Jay VanArsdale is, that with a background in sculpture, he tends to see joints that we have trouble picturing. Not that he invents these joints, some we have seen before some not, he is good at getting us to think when we see a joint together about how it may be put together.

An example of this is when I first saw the Japanese temple base joint where there are 4 goosenecks. You think wow pretty, then you wonder HOW it works finally then you find it slides at an angle and your head stops that ache you get when you use it to think.

Ill work on trying to follow our progress through this blog or I may even focus a blog on that specific project as it is a 14 month project.

Give this joint a try. There have to be many ways to attack this thing.

a roof for the Bonzai garden

The Bonzai garden at lake merritt has a board to post what is going on for the day. It was made by the Daiku Dojo members a few years back. The top piece was really just a straight board. While we were waiting for our cedar for our big fence project, Jay thought we could give the post it board a little more flair. Jim has been working on this and the picture at left shows the new piece. Angles cut on top and the wings are single pieces cut by hand and the edges of the wings have carving mimicing the curves.
What I really like is that this is a pretty simple was to add a roof (small) to something and have it look really sweet.

Thursday, October 8, 2009

Kitchen cabinet doors


In taking off the paint on my kitchen cabinets I found that I had three different types of doors. It looks like at least 4 of 6 had been replaced but possibly even up to 4. The larger cabinets were old doug fir plywood, which I thought would look bad in a natural finish. below the sink the doors had a piece of pine added to the inside edge to make them 1/2 wider, I figured these were just some replacement doors that were fit and likely cheap. The last 2 doors were likely original and were tung and groove doug fir. I had initially planned to just replace the under the cabinet doors with a bit of a Japanese influence, but as I was to takle all I realized I had better think my plan over.

After tearing down my barn, I had a stack of old growth doug fir, nail holes and all, some a bit cracked, these seemed to be the logical replacement. In a standard frame offset with furniture grade vertical grain plywood, I think the new doors are simple and a nod to both old and new.
After installing the doors, I still have yet to add handles of some type. I had thought a nod to Krenov might be a nice touch.

Sunday, July 12, 2009

inca planer blades


Quick post here. I happened to find some new old stock inca blades in the UK on ebay. Since they are a pain to get and Eagle never seems to have them in stock I was happy to get them delivered and all for about 50 bucks.

And they shipped on Monday and I received them on Sat. I could not even get the mail from NYC that fast. I'll be sending these to my uncles shop to have him draw up CAD plans for them and make me a few sets out of high speed steel. If all goes well and there is interest I'll have a run made and sell them. The CAD drawings alone will be great as any good shop can cut them at that point and have them heat treated.

Saturday, June 20, 2009

A great community project


A few weeks back, the Japanese woodworking group I am a part of, finished and installed a Cedar gate at the garden in Lake Merritt in Oakland, California. It began like all community programs -gifted monies and we work for free through the guidance of Jay VanArsdale

Originally designed by Jay, the gate did change when a student made a series of errors on a 10"x 10" from a 1000 year old cedar tree. In the Japanese tradition, one must never waste wood, but work around any error. Additionally in the same tradition it seems that a teacher knows that mistakes will be made and that is part of the process of learning ( It still does not keep one from getting spitting mad). Originally the gate frame top piece would have been a roof on its own. After the damage was done, a new idea was conceived to add a roof of cedar to cover the error.

The picture is of the finished gate when we were able to assemble the structure. Many students worked on this project in varying degrees, both in time and skill level. I have no name list and do not want to leave anyone out, so Ill just not metion anyone by name except for Jay. Jay spent class time assisting and coaching as well as many hours at home to get the gate ready for the 5oth anniversary of Lake Merritts Japanese garden. There were many pictures taken of the process which was a great learning experience. Although they are not posted yet (All of the website time is unpaid) the pictures will be posted likely by end of the summer at Daikudojo.org

If you are in the bay area and interested in woodworking by hand I urge you to look into these classes at the Oakland community colleges. I travel 100 miles to attend these classes that are on the weekends. Many travel similar distances. If you are at a distance further, I suggest you just focus on the website, there still is much that can be learned from the site and int wealth of information. Also every semester there are beginning classes available if you have little or no experience with wood. These classes focus on making a joint for the duration of the class day , learning sharpening, plane - set up and proper technique. If you are more advanced Jay will gladly give you a joint to do that is much more complex and the class has many examples of joints already made that you can take apart and get a good look at.

The gate in the picture was hand built. The finish is Bioshield penetrating oil. We took a Makita 5" power plane to the top to try and fix some errors, but besides some screws in the roof that are hidden the gate is just joints and wood set in the ground surrounded by tightly packed rock.
This is the beginning of a the larger project of replacing 200 feet of fencing and adding a few more gates in the garden if we get funding through a grant this fall. Ill keep you posted.

Friday, April 17, 2009

ReFind wood


I often read of people worried about running "old wood"through their Jointers or planers for fear of damage from unknown objects. What they miss is some of the finest woods that may ever grace their shop bench. I have a metal detector, and a craftsman jointer, planer that I use for nearly all my found wood needs. The metal detector finds those BB's fence metal and old nails deep in the wood the eye misses. My blades on my craftsman are about 35.00 a set of three and I gladly let them become nicked and cut in the cheapest way to get wood around.
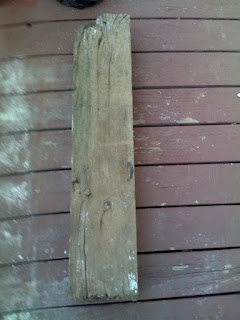
Recently I was hunting on a property in Woodland. There sat a 6x6 about 4 feet long. The classic greying of the oldgrowth lumber that long long ago was a fence post in a large field. Now turkeys are wadering around (The reason I discovered the wood) the posts as well as a 10x10 and a few other scrap redwood pieces. Often on old fence is replace either in front or back with a new metal wire fence leaving the old one in place. Some land owners are happy to part with the old fence and most of the posts 4x4 and larger are solid from the ground up so it can be a win/win if you just go and ask about the wood.
Most of the redwood I find looks like a milk chocolate bar, brown but in a lighter shade. Add some bio-shield ( I love that stuff) or lindseed oil and it can darken up like the deep browns of walnut.
I often think that many fear the nicking of a blade, but one can certainly find a cheap jointer or planer (mine was 100.00) to take one for the team if needed. Even among other woodworkers I often have them wondering what wood I am using. Nearly all of my fir or redwood is over 100 years old when it was initially milled. While there are imperfections, nail holes and cracks all this can be over looked in many applications.
I have made boxes, yoga blocks, trimmed a bathroom out, made flooring, made benches and on and on. All at little cost ( I even sold some milled redwood to the nieghbor to cover new manufactured beams in a beatiful house from the 20's) I can say there is nearly no way to tell that the beams are not massive redwood timbers covering as well a stove pipe.
So when in the country or near those old houses that are being ruined ( I mean remodeled) remember that you can grab windows, doors, 2xs and anything else the contractor is " fixing"
Even a deck from 20 - 30 years ago has prized timber compared to the garbage you will find at the local lumber yard.
So joint, or cut off that paint if it is there. And get that timber rolling in your shop.
And remeber some of that wood has been in the rain for a 100 years off and on. I sticker it mill it after a while then bring it into the house and stack it (like a good unmarried guy can do).
Nearly every board I cut would cost more to buy than a set of blades costs me. For me the decision is easy.
Now start looking for those nuggets in the rough.